# Welcome to the RaftModding docs!
**Welcome to RaftModding: Enhancing Your Raft Adventure!**
RaftModding is your go-to destination for expanding your Raft gameplay.
We are the largest community dedicated to mods, scripts, and utilities for Raft, the popular survival game.
Our platform serves as a central hub, offering a comprehensive overview of all things related to modding Raft.
{% hint style="info" %}
Interested in contributing to our documentation?\
Click [here](https://github.com/tekgamer950/raftmoddingdocs) to begin. :relaxed:
{% endhint %}
# Installing Raft Mod Loader
This tutorial is designed to guide you through the process of installing RaftModLoader.
## 1. Downloading the Launcher
**Start by downloading our latest launcher version from** [**here**](https://www.raftmodding.com/loader)**.**\
After downloading, you can place it anywhere you prefer.\
We suggest keeping it on your desktop or another easily accessible location for convenience.
Press the green button to download the latest launcher version from our website.
## 2. Terms of Service
**Open the downloaded file (*****RMLLauncher.exe*****) to launch the program**.\
When you start it for the first time, you'll see our Terms of Service.\
**You must agree to them to use our software.**\
Click 'Agree' to confirm your acceptance.
If you have privacy concerns or questions, don't hesitate to reach out to us on [Discord](https://www.raftmodding.com/discord).

## 3. Installation
After accepting the Terms of Service, the launcher will automatically download and install all the necessary files, as displayed below. **You don't need to take any action; simply wait**.\
The process is usually quick.

## 4. Launching modded Raft
After the launcher has downloaded and installed all the necessary files, a "**Play**" button will appear, as depicted below.\
**Press this button to start the game using the mod loader**.

{% hint style="info" %}
Remember, whenever you want to play with mods, initiate the launcher and press the button to launch the game with the mod loader.
{% endhint %}
## 5. Inside the game
After the game has loaded, you will find a **new menu in the Raft main menu**, as illustrated below. If the new menu does not appear in-game, please refer to our troubleshooting guide here.
## **6. Installing your first mod**
{% hint style="success" %}
Congratulations! If you've reached this point, **you've successfully installed RaftModLoader**!\
\
Now, **you are ready to install some actual mods**.
{% endhint %}
If something isn't working as expected, maybe take a look at our troubleshooting guide:
{% content-ref url="/pages/Kq1ItXHENo1Tu47hkztV" %}
[Troubleshooting](/getting-started/installing-raft-mod-loader/troubleshooting)
{% endcontent-ref %}
# Troubleshooting
Helping you to troubleshoot common issues with the Raft Mod Loader
If installing the mod loader is not working as expected, don't worry. Please take a look at the following document which describes some of the more common issues with installing the mod loader. If none of this works, please join our [Discord](https://raftmodding.com/discord) and we will be happy to help you!
## What's wrong?
First of all, we need to find out what's the problem. Which of the following descriptions describes your problem best? If an error popped up, try to find the headline with the text describing the error.
The menu inside the game does not show up
%20\(1\).webp?alt=media)\
This is what it should look like...\
\
[Link to the guide](/getting-started/installing-raft-mod-loader/troubleshooting/the-menu-inside-the-game-doesnt-show-up)
"An error occured while fetching for updates"
.png?alt=media) .png?alt=media)
[Link to the guide](/getting-started/installing-raft-mod-loader/troubleshooting/an-error-occured-while-fetchting-for-updates)
The game crashes on startup
%20\(2\).png?alt=media)
[Link to the guide](/getting-started/installing-raft-mod-loader/troubleshooting/the-game-crashes-on-startup)
There's an error counter going up very fast in the bottom right hand corner of the game
.webp?alt=media)
[Link to the guide](/getting-started/installing-raft-mod-loader/troubleshooting/there-are-error-notifications-in-game)
## Other / My problem could not be solved with this guide
It seems like your problem is a bit uncommon. But don't worry, we'll be happy to provide support on our [Discord server](https://raftmodding.com/discord). :blush:
# An error occured while fetching for updates
This guide aims to fix the following error : "An error occured while fetching for updates"
There are multiple reasons this issue can be happening. The first and most likely one is your antivirus interfering. Follow the linked guide and see if it helps:
{% content-ref url="/pages/z7vV6Jp2jDryi3VQ7vP5" %}
[Configuring your antivirus](/getting-started/installing-raft-mod-loader/configuring-your-antivirus)
{% endcontent-ref %}
If that doesn't help, don't worry we got you :wink:
{% content-ref url="/pages/RqXnoP4qhd3TQJai8vzK" %}
[Disabling IPV6](/getting-started/installing-raft-mod-loader/troubleshooting/an-error-occured-while-fetchting-for-updates/disabling-ipv6)
{% endcontent-ref %}
If that didn't help too try changing the DNS
{% content-ref url="/pages/J4H68e9rY5MKvMls9TKD" %}
[Changing the DNS](/getting-started/installing-raft-mod-loader/troubleshooting/an-error-occured-while-fetchting-for-updates/changing-the-dns)
{% endcontent-ref %}
## My problem could not be solved with this guide
It seems like your problem is a bit uncommon. But don't worry, we'll be happy to provide support on our [Discord server](https://raftmodding.com/discord). :blush:
# Disabling IPV6
This guide will explain how to disable IPV6
This issue might be caused by IPV6 being enabled on your computer. A Windows bug can cause the requests to fail when going through ipv6 and it can be safely disabled.\
\
1\. Open the **Control Panel** (through the Cortana search box for example).\
2\. Open **Network and Internet**.
3\. Open **Network and Sharing Center**.
4\. Click **Change Adapter Settings**.
5\. Right-click your connection and go to **Properties**.
6\. Uncheck the box next to **Internet Protocol Version 6 (TCP/IPv6) to disable it.**
7\. Select **OK to confirm** the change.
8\. **Restart the computer** and try again running the launcher.
# Changing the DNS
This guide will explain how to change your DNS to the Google one which is not blacklisting our website
1\. Let's check if that's the issue first. **Open your command prompt** by **typing CMD** in the Cortana search bar for example and **select "Run as administrator"**:
2\. **Run the following commands**: `nslookup raftmodding.com` and `nslookup raftmodding.com 8.8.8.8`
If the ip adresses are different that means that there's an issue with the DNS and it might be blocking the Raftmodding requests.\
\
3\. We will **change the DNS** to one that is not blacklisting our website like the Google DNS. Here's a guide on how to setup the Google DNS on your system: \
\
4\. Once you're done setting up the DNS make sure to **restart the computer** and try again running the Mod Launcher. You might also need to **change the DNS on your router**. The steps will be very dependent on your router.
# The menu inside the game doesn't show up
This guide aims to fix an issue where the mod menu doesn't appear in-game
## The menu inside the game does not show up
This is a fairly common issue so don't worry. Please do the following steps:
#### 1. Open the launcher
Close Raft if it is still running and open the launcher application as **administrator**.

#### 2. Open the settings
Click on Settings:gear:icon to open the Launcher settings.

#### 3. Change the starting method
In the settings, you need to enable **`Start Game From Steam`**:
#### **4. Start the game**
Now, close the Settings and press `Play` to start the game.
#### 5. Did it work?
If this worked, you should now see the modding menu inside the game. If you can not see the menu as shown below, try excluding the mod loader from your antivirus:
{% content-ref url="/pages/z7vV6Jp2jDryi3VQ7vP5" %}
[Configuring your antivirus](/getting-started/installing-raft-mod-loader/configuring-your-antivirus)
{% endcontent-ref %}
The mod menu inside of the game
# The game crashes on startup
Fixing the issue of the game crashing on startup
Same steps as for [The menu inside the game doesn't show up.](/getting-started/installing-raft-mod-loader/troubleshooting/the-menu-inside-the-game-doesnt-show-up)
# There are error notifications in-game
Fixing the issue of the error counter going up in the bottom right hand corner
In the following, we will **verify the files' integrity**. This is a Steam tool that allows checks and repairs broken game files.
1. Open Steam and open the *Library* tab.
2. Right-click *Raft* and select *Properties* in the pop-up-menu.
3. In the menu, select the *Local files* tab.
4. Click on the *Verify integrity of game files* button.
5. If the tool finds any broken files, it will automatically repair them.
6. Once done, you can close the windows.
7. Now, try to open the Launcher again.
8. Does it work now? If the error keeps coming up, this might be related to your Antivirus program.
*For visual guidance, check out the* [*Steam Support article*](https://support.steampowered.com/kb_article.php?ref=2037-QEUH-3335) *about this topic.*
{% hint style="info" %}
If you can't solve this problem with this guide, make sure to [contact us](#other) and we'll be happy to help you.
{% endhint %}
# Linux or Steam Deck installation
This Tutorial aims to show you how to install RaftModLoader on Linux and Steam Deck.
Setting up Raft Mod Loader is now easier than ever due to the proton compatibility layer built into Steam. This guide aims to show you how you can achieve this on your own Linux-based machine.
First, a starting note for the Steam Deck users:\
To access the Linux Desktop on the Steam Deck do the following:
Another general note:\
The install button on the Raftmodding website unfortunately does not work, so you will have to add the mods to the mod folder manually.
Now let's get started 😊
### 1. Setting up our game directory
First download the shim file from and download the Raft Mod Launcher from .
Next place both of the downloaded files into your Raft game folder usually located at /home/$USER/.steam/steam/steamapps/common/Raft.
{% hint style="info" %}
The .steam folder will be hidden if you have 'Show Hidden Files' disabled in your file manager so you will need to enable the setting.
{% endhint %}
The Raft folder should now look like this:
Before moving to the next step, make sure the shim file is executable. The shim file can be set as executable by opening the file properties in your file manager or running the following command inside of your terminal.
```bash
chmod +x shim
```
### 2. Setting up the launch parameters inside of Steam
First open Steam. Next go into your Steam Library, go to Raft, right-click onto the game and click on properties.
On the general tab you'll find an input field called launch options. Add the following into that field:
```bash
./shim %command%
```
### 3. Preparing the target file
Now startup Raft on Steam. The game should start up as usual. Close it once it is done starting.
Go back into your Raft game directory. There should now be a new file called 'target'. Open the file and replace Raft.exe with RMLLauncher.exe as seen below
```
/path/to/game/RMLLauncher.exe
```
### 4. Launching the game with mods
Startup Raft on Steam. You should now see the mod launcher coming up. Go through the setup process until you reach the following window.
Press play and the game should start with mods! You should see this mod menu once the game reaches the main menu:
{% hint style="info" %}
If you encounter any issues or the guide doesn't seem to work for you, please visit the #support-tickets channel on our [Discord](https://www.raftmodding.com/discord).\
\
Our team is more than happy to assist you. 🙂
{% endhint %}
#### Credits
This guide was made with the help of @xenozma. Feel free to ask them for assistance on the Raftmodding Discord regarding this guide.
# Configuring your antivirus
This page will guide you on resolving false positive errors on RMLLauncher, ensuring a smoother experience without unnecessary interruptions.
## **Why is my antivirus suspecting RMLLauncher to be a Trojan/Malware?**
{% hint style="success" %}
**RMLLauncher is completely safe to use.**\
\&#xNAN;*It's important to note that both RMLLauncher and Core are open-sourced, allowing users to analyze the code.*
{% endhint %}
Our launcher behavior might seem unusual to antivirus programs because it involves downloading files, loading code into the game and connects to servers.\
We also do not possess a yearly Microsoft code signing license, which can trigger alerts.
Since our software is open-sourced, If it were a virus, someone would have noticed by now.\
Rest assured, our community has thoroughly examined the software. So, you can trust RMLLauncher without any concerns. 😊
## 1. Adding exclusions in your antivirus
To prevent false positives for the launcher, add these two exclusions to your antivirus settings:
1. **RMLLauncher.exe**
2. **C:\Users\YourUserName\AppData\Roaming\RaftModLoader**
Select your Antivirus from the list below to get a detailed guide:
{% content-ref url="/pages/tenqQRFcnobDUeCbaGfw" %}
[Windows Defender](/getting-started/installing-raft-mod-loader/configuring-your-antivirus/windows-defender)
{% endcontent-ref %}
{% content-ref url="/pages/kwSOe9bB3qoX9fHnYEit" %}
[Malwarebytes](/getting-started/installing-raft-mod-loader/configuring-your-antivirus/malwarebytes)
{% endcontent-ref %}
{% content-ref url="/pages/OE99UJVl3ZzmDwxfLcmH" %}
[Avast](/getting-started/installing-raft-mod-loader/configuring-your-antivirus/avast)
{% endcontent-ref %}
{% content-ref url="/pages/hlhJfxIoLxP1EAajVK3s" %}
[Norton](/getting-started/installing-raft-mod-loader/configuring-your-antivirus/norton)
{% endcontent-ref %}
{% content-ref url="/pages/FjiriMaXIFpQxN8B75Ls" %}
[Bitdefender](/getting-started/installing-raft-mod-loader/configuring-your-antivirus/bitdefender)
{% endcontent-ref %}
{% content-ref url="/pages/xiN3a6hJSkgkWPyMVQxa" %}
[AVG](/getting-started/installing-raft-mod-loader/configuring-your-antivirus/avg)
{% endcontent-ref %}
Your antivirus is not on the list? Search on google **"how to add exclusions in \[Your antivirus name...]"** and there should be a support website from that antivirus explaining how to do it. You will have to add both exceptions [mentioned above ](#1.-adding-exclusions-in-your-antivirus):point\_up:
## 2. You should be done !
**Simply restart our launcher and it should be working !**
{% hint style="info" %}
If you encounter any further errors or experience the same issue, please visit the #support channel on our [Discord](https://www.raftmodding.com/discord).\
\
Our team is more than happy to assist you. 🙂
{% endhint %}
# Windows Defender
Explaining how to exclude the Raft Mod Loader from the Windows Defender antivirus
Go into "Windows Security" -> "Virus & threat protection". Then click on "Manage settings" under "Virus & threat protection settings":
Scroll down to Exclusions and click on "Add or remove exclusions":
Click on "Add an exclusion" -> "File" then select the **RMLLauncher.exe**.
Do that again but instead of selecting "File" you now want to select "Folder" and exclude the **RaftModLoader** folder which is located at **C:\Users\YourUserName\AppData\Roaming\RaftModLoader** .
This is how the exclusions should look like in the end:
Finally restart the computer to apply the settings!
## Aaaand you're done !
**Simply restart our launcher and it should be working !** :thumbsup:
# Malwarebytes
Explaining how to exclude the Raft Mod Loader from the Malwarebytes antivirus
Open Malwarebytes and go into the settings and select the "Allow List" tab. Click on add, then select allow file or folder.
Select the **RMLLauncher.exe** as the file you want to exclude:
Then hit "Done" and do the same for the **RaftModLoader** folder which is located at **C:\Users\YourUserName\AppData\Roaming\RaftModLoader** .
Next let's add the exceptions for the Website:
Click on "Add" -> "Allow a website" and exclude `fastdl.raftmodding.com`
Then hit done and do the same for `raftmodding.com`
Your exception list should look something like this :
Finally restart the computer to apply the settings!
## Aaaand you're done !
**Simply restart our launcher and it should be working !** :thumbsup:
# Bitdefender
Explaining how to exclude the Raft Mod Loader from the Bitdefender antivirus
Open Bitdefender, go into the "Protection" tab and open the "Antivirus". Switch to the "Settings" tab and select "Manage Exceptions":
Click on "Add an Exception":
Create an exception for the RMLLauncher.exe making sure every protection feature will be disabled:
Then hit "Save" and do the same for the RaftModLoader folder which is located at **C:\Users\YourUserName\AppData\Roaming\RaftModLoader** as well as the **HMLCore.exe** file located in **C:\Users\YourUserName\AppData\Roaming\RaftModLoader .**
These are the exceptions you should have now:
Also make sure to check the quarantine for any files related to the mod loader and to restore them!
Finally restart the computer to apply the settings!
## Aaaand you're done !
**Simply restart our launcher and it should be working !** :thumbsup:
# Avast
Explaining how to exclude the Raft Mod Loader from the Avast antivirus
Open Avast then click on "Menu" in the top right and select "Settings":
Go into the "General" then "Exceptions" tab:
Now click on "Add Exception"-> "Browse". It is a bit tedious to select exceptions as you need to check the box next to the File/Folder. First you select the **RMLLauncher.exe :**
And then you select the **RaftModLoader** folder which is located at **C:\Users\YourUserName\AppData\Roaming\RaftModLoader**:
Once both are selected hit "Ok". Then "Add Exception":
Now click on "Add Exception" again:
And let's add exceptions for the website:
`raftmodding.com`
and `fastdl.raftmodding.com` .
This is how the exceptions should look like for you in the end:
Now go into the "Blocked & Allowed Apps tab" and click on "Allow App":
Then "Select App Manually":
Do this for the RMLLauncher.exe
as well as the **HMLCore.exe** file located in **C:\Users\YourUserName\AppData\Roaming\RaftModLoader .**
This is what the exceptions should look like:
Finally restart the computer to apply the settings!
## Aaaand you're done !
**Simply restart our launcher and it should be working !** :thumbsup:
# Norton
Explaining how to exclude the Raft Mod Loader from the Norton antivirus
First let's add the exception to the Norton Antivirus:
Open Norton then go to "Settings"-> "Scans and Risks" and scroll down to "Exclusions/Low risks":
At "Items to Exclude from Scans", click on "Configure"->"Add Files":
Add an exception for the **RMLLauncher.exe** you downloaded:
As well as for the **HMLCore.exe** located in **C:\Users\YourUserName\AppData\Roaming\RaftModLoader .**
Then click on "Add Folders" to add an exception for the entire **RaftModLoader** folder located at **C:\Users\YourUserName\AppData\Roaming\RaftModLoader .**
This is what your exceptions should look like. Confirm by hitting "Apply" then "Ok":
Now add the exact same exceptions for "Items to Exclude from Auto-Protect, Script Control, Behavioral Protection and Download Intelligence Detection":
After you're done hit "Apply" and then "Ok":
If the Raft Mod Loader can't connect to the internet, you'll need to add an exception to your firewall too:
1. Go to **Settings** -> **Firewall** -> **Application Control**
2. Use the search function to find **`HML`**
3. Allow network access for **`HML`**
Finally restart the computer to apply the settings!
## Aaaand you're done !
**Simply restart our launcher and it should be working !** :thumbsup:
# AVG
Explaining how to exclude the Raft Mod Loader from the AVG antivirus
Open AVG then click on "Menu" in the top right and select "Settings":
Go into the "General" then "Exceptions" tab:
Now click on "Add Exception"-> "Browse". It is a bit tedious to select exceptions as you need to check the Box next to the File/Folder. First you select the **RMLLauncher.exe :**
And then you select the **RaftModLoader** folder which is located at **C:\Users\YourUserName\AppData\Roaming\RaftModLoader**:
Once both are selected hit "Ok". Then "Add Exception":
Now click on "Add Exception" again:
And let's add exceptions for the website:
`raftmodding.com`
and `fastdl.raftmodding.com` .
This is how the exceptions should look like for you in the end:
Now go into the "Blocked & Allowed Apps tab" and click on "Allow App":
Then "Select App Manually":
Do this for the RMLLauncher.exe
as well as the **HMLCore.exe** file located in **C:\Users\YourUserName\AppData\Roaming\RaftModLoader .**
This is what the exceptions should look like:
Finally restart the computer to apply the settings!
## Aaaand you're done !
**Simply restart our launcher and it should be working !** :thumbsup:
# Installing a mod
This tutorial is here to guide you through the process of installing a mod on Raft using RaftModLoader!
## 1. Installing the mod loader
If you haven't done so already, please install RaftModLoader. \
For detailed explanations, refer to our guide on this topic.
{% content-ref url="/pages/Z8OY6gQt59Is2eDWLj0Q" %}
[Installing Raft Mod Loader](/getting-started/installing-raft-mod-loader)
{% endcontent-ref %}
## 2. Finding mods
To search and discover mods of your choice, we strongly recommend utilizing [our mods directory](https://www.raftmodding.com/mods). Simply scroll through the page and click on the mod you're interested in.\
Alternatively, you can find a list of the most popular mods on [our home page](https://www.raftmodding.com/).

## 3. Installing a mod
On a mod's page, you can find all the information about the mod.\
**To install it, just click the large green '*****Install Mod*****' button.**

Your browser may prompt you to allow raftmodding.com to open the Raft Mod Loader for installing a mod. **Click '*****Open*****' to proceed.**

{% hint style="info" %}
If nothing happens, you can download the mod's .rmod file by clicking '***Download this mod***' and place it in the '***mods***' folder inside your Raft directory.
{% endhint %}
## 4. Allowing the mod installation
Now, the Raft Mod Installer should open.\
It will display the mod that is about to be installed and ask you once again if you want to proceed. **Click '*****Yes, Install It*****' to begin the installation.**

## 5. Loading the mod
We've installed the mod! To load it, start the game using the launcher's 'Play' button.\
In the game, go to 'Mod Manager' tab. **Click '*****Load Mod*****' if available**; for Permanent Mods, no action is needed.


## 6. You are done !
If everything worked out, the mod status will be green, and the text should say '***RUNNING...***' as shown below.

{% hint style="success" %}
There you have it! Your first mod is now successfully installed and active!
{% endhint %}
## **Troubleshooting**
Encountering issues? Don't worry! If anything isn't working as expected, join our [Discord server](https://www.raftmodding.com/discord), and we'll be more than happy to assist you.
# Mods in multiplayer
This page explains multiplayer mod usage.
You've learned [how to install mods](/getting-started/installing-a-mod) and perhaps enjoyed playing solo.\
Wondering how to play modded Raft together? Here's the key:
## **General Rule**
In a modded game, ensure all players in multiplayer have the mod loader and the same mods installed.\
Some mods may function individually, but others might disrupt the world or crash the game if not installed universally.
## **Compatibility in Multiplayer**
As far as we know, most mods should work in multiplayer.\
For confirmation, check the mod's page in [our mods directory](https://www.raftmodding.com/mods).
## **Have More Questions?**
If you need further assistance, feel free to ask us anything on our [Discord](https://www.raftmodding.com/discord).
# How to run multiple raft instances
A quick guide to run multiple Raft instances on a single computer with different Steam accounts, ideal for testing multiplayer mods.
I'll guide you through running multiple Raft instances simultaneously. To begin, you'll need:
1. [**Sandboxie-Plus:**](https://sandboxie-plus.com/) Allows isolated program execution.
2. [**A Second Raft Copy**](https://store.steampowered.com/app/648800/Raft/)**:** You need 2 Raft accounts for running two instances.
Let's get started!
## **1. Installing Sandboxie-Plus**
* Download and install Sandboxie-Plus from [here](https://sandboxie-plus.com/).
* Creata a new sandbox, name it as you like and add an access to your drive as shown below.
{% hint style="info" %}
We recommend granting access to the entire drive in the isolated environment because it includes crucial folders like AppData, world directories, Raft Settings, and Mod Loader files.
{% endhint %}
## **2. Duplicating Steam Software**
* Create a new folder for the second Steam.
* Copy your steam folder in this folder (You may want to remove other games than raft in the destination folder).
## **3. Installing Steam in Isolated Environment**
* Run steam.exe in the second Steam folder using Sandboxie-Plus.
* Start Steam in the isolated environment and select "Run As UAC Administrator".
## **4. Starting Raft**
* Log in with your second Steam account.
* Start Raft with "-rml" or through RMLLauncher opened inside sandboxie too; it should work seamlessly!
# How to create a mod project
This tutorial is here to guide you through creating a mod project on Raft using RaftModLoader!
Let's get started with the requirements! To get started modding you will need the following softwares :
* ****[**Visual Studio Community**](https://visualstudio.microsoft.com/downloads/). We highly recommend you to download the 2019 version.
* [**Unity 2019.3.5f1**](https://unity3d.com/fr/unity/whats-new/2019.3.5). If you have [UnityHub](https://public-cdn.cloud.unity3d.com/hub/prod/UnityHubSetup.exe) installed simply click [here](http://fastdl.raftmodding.com/downloadRaftUnityVersion.php).
* ****[**dnSpy**](https://github.com/0xd4d/dnSpy/releases/latest). This is the latest available version.
{% hint style="danger" %}
**You have to use Unity 2019.3.5f1! Using another version is not supported!**
{% endhint %}
Now that you have the required softwares, let's create your mod project!
**1)** Open the RMLLLauncher and create a mod project by using the mod creator as shown below.

**2)** In the project name text field enter your mod name and hit **Create Project!** It will then tells you if it has succeeded and opens you the project folder as shown below.

**3)** Now that your mod project is created you can open the **.sln** file, in the case above i open **ExampleMod.sln** with Visual Studio. After opening it, open the **.cs** file as shown below.

**4)** Now that we created our mod project and opened it we can begin creating our mod! As you can see on the screenshot above, there is a lot of green lines, those are comments, read them to know what every line do. Now, let's create a shortcut of our project folder in our mods folder so we won't have to move files or build the mod each time we modify something in our mod. Yeah this is a great feature! 😁
The folder is by default located in ***Documents\RaftModding\YourProjectName\YourProjectName***

Create a shortcut of this folder. **Its the folder that contains the`modinfo.json`file and the`.cs`file(s).** \_The main folder should also work, but we highly recommend you to create a shortcut of the second one.\_
**6)** Now, let's start the mod loader, Load our mod and open the console using F10 to see what's happening.

Just after loading the mod. The status change to green and says "Running...". Your mod is now running!

As you can see when you press F10 it executes the code in the Start() method.
**7)** Now that you know how to write code, to modify your mod information such as its description, its license, the icon, the banner etc simply go in to your mod project files and edit the **modinfo.json** file as shown below.

If you want to know more about this file, how to add an icon, what is the excludedFiles field etc, click below.[The modinfo.json file/modding-tutorials/how-to-create-a-mod-project/the-modinfo.json-file](https://github.com/TeKGameR950/RaftModdingDocs/blob/master/modding-tutorials/how-to-create-a-mod-project/broken-reference/README.md)
**8)** Now that you know how to write your mod and how to change its information to build it, simply generate the visual studio project and our build script will automatically pack/build your mod as shown below. The build script will generate a new file named `YourModName.rmod` This file is the mod file to upload on our [site](https://www.greenhellmodding.com/) and to put in the mods folder.

**And here it is! You made your first mod project! Keep in mind this tutorial is just the requirements & basics! More advanced tutorials are coming soon!**
# The modinfo.json file
This page aims to give you all the needed information about the modinfo.json file.
Here is a list of all the fields of the modinfo.json file and a small description/usage of them. More info about them below this table.
| Field Name | Description |
| ------------------------ | --------------------------------------------------------------------------------------------------------------------------------------------------------------------------------------------------------------------------------------------------------------------------------------------- |
| **name** |
Type : String
Description : The display name of your mod.
|
| **author** |
Type : String
Description : Your username.
|
| **description** |
Type : String
Description : A small description of your mod.
|
| **requiredByAllPlayers** |
Type : Bool
Description : Is the mod required by all players to work?
Description : An icon for your mod. (Can be seen in the mod manager list)
Usage : We recommend you a 512x512 png or jpg image.
|
| **banner** |
Type : String / Path
Description : A banner for your mod. (Can be seen in the mod manager list)
Usage : We recommend you a 660 x 200 png or jpg image.
|
| **gameVersion** |
Type : String
Description : The version of Green Hell that you made was made for.
Usage : This is just for info, Mods should remain compatible across versions.
|
| **updateUrl** |
Type : String / Url
Description : A link that returns the latest available version of your mod.
Usage : Our site provides you an url when you release your mod.
|
| **isModPermanent** |
Type : Boolean (true or false)
Description : Defines if your mod is permanent. Permanent mods are loaded by default and can't be unloaded. This is needed when mods add new items/blocks that can't really be unloaded without causing issues.
|
| **excludedFiles** |
Type : Array of strings / List of strings
Description : Allows you to specify files to not load. This doesn't support wildcards yet.
Usage : Useful when you want to exclude files like readme or source files.
|
**Icon & Banner Fields :** \
**Just add an image to your solution folder where your** **`.cs`** **files and the** **`.csproj`** **file is and edit the** **`modinfo.json`** **file as shown below.**

**UpdateUrl Field :** \
**RaftModLoader fetch this link to know what is the latest available version of your mod, if the currently installed version is not equal to the version returned by this url it will say that the mod is outdated.**\
**Our website offer this service with a nice automation system. Available on the following link once you have a mod slug.**\
`https://www.raftmodding.com/api/v1/mods/`**`YOURMODSLUG`**`/version.txt`
**requiredByAllPlayers Field :**\
**If this field is set to true and the mod is loaded it will kick any player attempting to join that does not have the same mod and the same version. If your mod adds new items or new blocks, this definitely needs to be true! So nobody will be able to join with missing blocks!**
**ExcludedFiles Field :** \
**This is a simple list of excluded files as shown below.**

# How to create an AssetBundle
This tutorial is designed to demonstrate how to import assets into the game, including 3D models, textures, prefabs, particles, and more.
Let's get started with the requirements!\
For this tutorial you will need the same requirements as the first tutorial.
**1)** First, create a new Unity project with the same version as the one required in [**How to create a mod project**](https://api.raftmodding.com/modding-tutorials/how-to-create-a-mod-project).
**2)** Then once the first step is done, download [this file](https://fastdl.raftmodding.com/AssetBundleBuilder.zip) and place it into your Unity Project as shown below. This will allow you to build your asset bundle file.
**3)** Add your stuff to the asset bundle as shown below.
**4)** Once you have everything in your assetbundle, build it by right clicking anywhere and clicking on **Build AssetBundles** as shown below.
**5)** If your assetbundle has succeeded building you should be able to find it in **Assets/AssetBundles**; Once you found it, copy it into your mod project folder where your .cs files and your modinfo.json file are located as shown below.

**6)** Now let's load it into the game using our previous mod made in the [**How to create a mod project** ](https://github.com/TeKGameR950/RaftModdingDocs/blob/master/modding-tutorials/broken-reference/README.md)tutorial. Open your mod project and change your start method type from **`void`** to **`IEnumerator`** and copy the code below into the start method as shown below; You will also need to create a new variable in your mod to be able to access the asset bundle from anywhere in your mod.
{% tabs %}
{% tab title="Help Image" %}

{% hint style="info" %}
If\*\*`IEnumerator`\*\* is underlined in red, simply add \*\*`using System.Collections;`\*\*at the top of your mod file.
{% endhint %}
{% endtab %}
{% tab title="Code" %}
```csharp
AssetBundle asset;
public IEnumerator Start()
{
AssetBundleCreateRequest request = AssetBundle.LoadFromMemoryAsync(GetEmbeddedFileBytes("tutorial.assets"));
yield return request;
asset = request.assetBundle;
}
```
{% endtab %}
{% endtabs %}
**7)** Loading an asset bundle is good, but we also need to unload it when we unload our mod. So, to do that in your ***`OnModUnload`*** method simply add **`asset.Unload(true);`** as shown below.

**8)** Now, to load something from our asset bundle simply use **`asset.LoadAsset("assetname")`** for example to load the ***RedCube*** that i added into the example asset bundle earlier i can just do **`asset.LoadAsset("RedCube")`** as shown below.
If you done everything correctly your asset should now be in the game. For example my red cube spawned in the mainmenu :smiley:
And here is it! As this can be a bit complicated if you encounter any issue or if you are blocked at a specific step, feel free to join our [Modding Discord](https://www.raftmodding.com/discord) and ask for help in [#support](https://discordapp.com/channels/451507895075471383/636994378618896436).
# How to create console commands
This tutorial is intended to guide you through creating custom console commands using the new console attributes.
Console commands are method attributes, that means that you just have to add `[ConsoleCommand(name: "...", docs:"...")]` or `[ConsoleCommand("...","...")]` above your method.\
The **name** argument is the command name itself.\
The **docs** argument is the command description.
{% hint style="info" %}
**Your method does not need to be public but it needs to be static!**
{% endhint %}
If you want to get the arguments of your command when its ran you can simply add a string\[] parameter named `args` as shown below.
```csharp
[ConsoleCommand(name: "useful", docs: "this command is useful.")]
public static void MyCommand(string[] args)
{
Debug.Log("You entered " + args.Length + " arguments!");
}
```
The method can also have a string return type and will display the returned value as shown below.
```csharp
[ConsoleCommand(name: "useful", docs: "this command is useful.")]
public static string MyCommand(string[] args)
{
return "You entered " + args.Length + " arguments!";
}
```
As said above, commands needs to be static, so in order to access your non static variables you can use the mod instance as shown below.
```csharp
public string myNonStaticVariable = "some stuff";
public MyModType instance;
void Start(){
instance = this;
}
[ConsoleCommand(name: "useful", docs: "this command is useful.")]
public static string MyCommand(string[] args)
{
return "My Variable : " + instance.myNonStaticVariable;
}
```
{% hint style="info" %}
The commands are automatically registered and automatically unregistered when the mod is unloaded.
{% endhint %}
# Harmony basics
This tutorial is intended to guide you through using Harmony to patch the game methods and more.
```csharp
using HarmonyLib;
```
## Adding to Code
To make your code work with existing mechaincs many times you will need to add your own code to a built in object. This can also let your mod act differently depending on if the player has specific other mods installed as well such as modifying recipes to use mod items if available or use vanilla items otherwise.
Harmony lets you do this by creating Patches. There are a few valid ways to set up your patches but a reliable one is to use attributes.
Each Patch will be its own class like so:
```csharp
[HarmonyPatch(typeof(BlockCreator), "CanBuildBlock")]
public class HarmonyPatch_IgnoreCollisionOnAlt
{
[HarmonyPrepare]
static bool IsCoolModInstalled()
{...}
[HarmonyPostfix]
static BuildError CheckForAlt(BuildError __result)
{...}
}
```
With one or more static methods that add or act on the target code.
{% hint style="warning" %}
Remember, your methods need to be static!
{% endhint %}
The class attribute lets Harmony know "what" to use the code on. typeof(BlockCreator) means it is trying to change how one of the methods of the BlockCreator works. That method is CanBuildBlock() and Harmony searches for it by string so make sure it matches the method name!
The method attribute lets Harmony know "when" to use the code in the patch. There are \[HarmonyPrepare], \[HarmonyPrefix], \[HarmonyPostfix], \[HarmonyTranspiler], and \[HarmonyTargetMethod] each executing at a different time or in a different way.
### \[HarmonyPrepare]
This lets you check some things before the patch takes place to see if you even want to change something.
This method expects you to return `false` to indicate Harmony should skip this patch.
```csharp
[HarmonyPrepare]
static bool IsBoxOpeningChanged()
{
//Look at all methods that got patched.
foreach(MethodBase method in Harmony.GetAllPatchedMethods()){
//See if the one you need has been modified
if(method.Name == "OpenBox")
//Skip patch because another mod changed something you use
return false;
}
return true;
}
```
### \[HarmonyPrefix]
This code takes place just before the original method happens and can be used to skip it all together.
This means you can replace a method entirely by having a Prefix do stuff then skip the original method by returning `false`
If the original method needed to return some value the patched method can accept the `ref "Type" __result` arguement by reference. This will make it look like the original method is returning whatever `__result` is set to
```csharp
[HarmonyPrefix]
static bool AlwaysReturnTrue(ref bool __result)
{
//Set return value to true
__result = true;
//Tell Harmony to not run the original method
return false;
}
```
You can also use this method to store values that can be accessed in the Postfix if you have one via `__state`. You can use `ref` or `out` to set the `__state` to whatever value or type you want. If you need to store more data then you need to make your own object to pass on to the Postfix
```csharp
static void Prefix(out Stopwatch __state)
{
__state = new Stopwatch(); // Stopwatch is a custom timer class
__state.Start();
}
static void Postfix(Stopwatch __state)
{
__state.Stop();
FileLog.Log(__state.Elapsed.ToString());
}
```
### \[HarmonyPostfix]
This code takes place right after the original method. It can take in the `__result` from the original method and use it or even change it.
One benefit of Postfixs is that they always run. No matter where the original method escaped its code from it will go to the Postfix right after.
{% hint style="info" %}
One quirk of Postfixs is that they can either change `__result` by ref or can return a value that would work the same way, but if they return a result it has to be the same Type as whatever the first arguement in the method is!
{% endhint %}
```csharp
[HarmonyPostfix]
static BuildError CheckForAlt(BuildError __result, BlockCreator __instance)
{...}
```
### \[HarmonyTranspiler]
Transpilers are a much more advanced way to get your own code to run. It is a bit out of the scope of a tutorial here so I will link to [this article](https://harmony.pardeike.net/articles/patching-transpiler.html#basic-transpiler-tutorial)
To give a simplified overview: Instead of writing code to be executed, you are looking at all of the IL instructions that a chunk of code represents and doing some of your own instructions whenever you think the right time is.
There are also wonderful tools out there that help show you what your IL code will look like from C# code snippets. Try checking out [LINQPad](https://www.linqpad.net/)
### \[HarmonyTargetMethod]
TargetMethod is another powerful tool that lets you reuse your code and apply changes to multiple different methods. It can also be used to conditionally apply changes based on what the code finds.
TargetMethod must return a MethodBase type which points at which method your patch will apply to. Alternatively \[HarmonyTargetMethods] can be used to apply the same patch logic to multiple methods as well though in this case it expects some IEnumerable collection of MethodBases.
Two different ways of doing this would be to iterate through, patching all methods:
```csharp
[HarmonyTargetMethods]
static IEnumerable PatchInventoryMethods()
{
yield return AccessTools.Method(typeof(Inventory), "Add");
yield return AccessTools.Method(typeof(Inventory), "Remove");
// you could also iterate using reflections over many methods
}
```
or, affect a group of methods that you collect:
```csharp
[HarmonyTargetMethods]
IEnumerable PatchAllPlayerMethods()
{
//Find all non-void methods beginning with "Player"
return AccessTools.GetTypesFromAssembly(someAssembly)
.SelectMany(type => type.GetMethods())
.Where(method => method.ReturnType != typeof(void) && method.Name.StartsWith("Player"))
.Cast();
}
```
## Valid Patch Rules
Your patch methods can accept a variety of arguements that let you peek into the code that is running or is about to run.
Each prefix and postfix can get all the parameters of the original method as well as the instance (if original method is not static) and the return value. In order to patch a method your patches need to follow the following principles when defining them:
* A patch must be a static method
* A prefix patch has a return type of void or bool
* A postfix patch has a return type of void or the return signature must match the type of the first parameter (passthrough mode)
* Patches can use a parameter named `__instance` to access the instance value if original method is not static
* Patches can use a parameter named `__result` to access the returned value (prefixes get default value)
* Patches can use a parameter named`__state` to store information in the prefix method that can be accessed again in the postfix method. Think of it as a local variable. It can be any type and you are responsible to initialize its value in the prefix
* Parameter names starting with three underscores, for example `___someField`, can be used to read and write (with 'ref') private fields on the instance that has the same name (minus the underscores)
* Patches can define only those parameters they want to access (no need to define all)
* Patch parameters must use the exact same name and type as the original method (object is ok too)
* Patches can either get parameters normally or by declaring any parameter ref (for manipulation)
* To allow patch reusing, one can inject the original method by using a parameter named `__originalMethod`
{% hint style="info" %}
Using three underscores `___likeSo` to read variables is quite usefull
{% endhint %}
Transpilers have some other optional parameters:
* A parameter of type ILGenerator that will be set to the current IL code generator
* A parameter of type MethodBase that will be set to the current original method being patched
* They must contain one parameter of type `IEnumerable` that will be used to pass the IL codes to it
{% hint style="info" %}
There are other ways to combine attributes and structure your patches. Try checking [here](https://harmony.pardeike.net/articles/annotations.html#combining-annotations) if your mod starts getting complicated.
{% endhint %}
## Applying your patches
To get your code actually working Harmony needs to be told to do all the work you have set up for it. One place to do that from is Start method of your Mod.
To do this make sure your file is already `using HarmonyLib;`
Then you need to create a new instance of Harmony with an id for your set of patches. A common structure for an id is "com.company.project.product" or for us "com.User.Project.Feature"
Then we tell the Harmony instance to patch everything it can find in our code. In older versions you need to tell Harmony to look for the currently running game with `Assembly.GetExecutingAssembly()` to try and patch it but these days it will look there by default.
```csharp
public void Start()
{
MyInput.Keybinds.Add("Alt", new Keybind("alt", KeyCode.LeftAlt, KeyCode.RightAlt));
harmonyInstance = new Harmony("com.Soggylithe.IgnoreBuildCollision");
harmonyInstance.PatchAll(Assembly.GetExecutingAssembly());
Debug.Log("Place Anywhere successfully loaded! - Default-AltKey");
}
```
Remember, anything you do to load your mod you need to undo when you unload it to prevent strange errors and to keep the client stable. This also means you need to tell your Harmony instance to unpatch the things you changed.
```csharp
public void OnModUnload()
{
MyInput.Keybinds.Remove("Alt");
harmonyInstance.UnpatchAll(harmonyInstance.Id);
Destroy(gameObject);
Debug.Log("Mod Brine has been unloaded!");
}
```
In older versions you needed to `Destroy()` the mod object when unloading but that is also handled gracefully these days.
### *Written by: Soggylithe 10/31/2020*
### *Feel free to @Soggylithe in the* [*RaftModding Discord* ](https://www.raftmodding.com/discord) *if you have any questions.*
# Getting access to the modding repositories
In order to make a mod, it is essential to understand how the game works under the hood. Therefore, you can use tools like [dnSpy](https://github.com/dnSpy/dnSpy) (to decompile the game's code) or [AssetRipper](https://github.com/AssetRipper/AssetRipper) (to export the game's assets). However, the results of those tools are usually not ideal and need to be fixed up in some places.
That's why we are uploading the exported contents of the game for every update to repositories at gitlab.com.
### What's contained in the repositories?
There are two repositories available:
* The [raft-code](https://gitlab.com/traxam/raft-code) repository contains the decompiled code of the game. It is not possible to compile this code and you won't be able to link your mods agains this code. The purpose of the repository is to provide a "reference" decompilation so that we can talk about certain line numbers in the original code (i.e. by linking to a certain line number in a certain file via the GitLab web frontend). GitLab also provides a useful search function.
* The [raft-unity-project](https://gitlab.com/traxam/raft-unity-project) repository contains an optimized export of the game's unity assets. You can [open the repository with a specific (!) version of the Unity Editor](https://gitlab.com/traxam/raft-unity-project/-/wikis/Setup) to take a look at Raft's textures, prefabs, scenes, etc. and you will need to use the Unity Editor with this repository if you want to [create AssetBundles](https://github.com/TeKGameR950/RaftModdingDocs/blob/master/modding-tutorials/broken-reference/README.md) to add new content to the game. The raft-unity-project contains stubbed scripts (that means that only properties and fields of the scripts are available and methods are not) to avoid Unity complaining about compilation errors.
{% hint style="danger" %}
You can neither compile the raft-code nor the raft-unity-project into a working game!
{% endhint %}
### Why are the repositories access-controlled?
You might have already found out that the repositories are not available to the public. This has multiple reasons:
1. We do not want to share Raft's code with anyone. The content of the repositories is none of our main tasks here at RaftModding. We do provide them but we don't want to put focus on them.
2. We are not allowed to share Raft's code with anyone. Raft is a game that you need to pay for. Its source code is copyrighted and we don't want to get into legal trouble for distributing the game's source code. In fact, if Redbeet (the game studio that made Raft) told us to stop hosting these repositories, we would do so immediately!
### Who can access the repositories?
We will only provide access to people who already own the game. This is because everyone who owns the game is also able to decompile it and extract its assets on their own, we're only making it easier.
More specifically, access is only provided to you if you meet the following criteria:
1. You need to own the game on Steam and verify with us that you do.
2. You need to have a GitLab account.
{% hint style="warning" %}
If you have bought the game from some other place than Steam or can't verify with us that you own the game on Steam, we will not give you access.
{% endhint %}
### What am I allowed to do with the repository contents?
Other than the mod loader and website themselves, the Raft code and assets are not owned by us. They are owned by Redbeet Interactive and/or Axolot Games and provided to you with the license that you obtained when you bought the game.
In the context of modding, this especially means the following:
* Do **not** distribute these sources!
* You can use the sources to build your mod but you may not include protected materials in the files you upload.
{% hint style="info" %}
We're no law experts and this is no real legal advice. You are responsible for your own actions!
{% endhint %}
### How do I get access?
For the purpose of verification, the process of getting access is a bit tedious.
1. In your Steam profile, make sure that the list of your owned games is visible to everyone. We need to be able to see your games list to verify that you own Raft.
2. Visit [utils.raftmodding.com](https://utils.raftmodding.com/), sign in with steam and follow the steps.
Happy modding!
# RAPI
The RAPI class provides convenient methods for various actions, including adding new items and showing the cursor, making modding tasks easier and more accessible.
## Checks if the game is running on a dedicated server.
`Returns true if the game is running on a dedicated server, false otherwise.`
```csharp
// RAPI.IsDedicatedServer()
public static bool IsDedicatedServer()
```
***
## Checks if the current active scene is the main menu.
`Returns true if the current active scene is the main menu, false otherwise.`
```csharp
// RAPI.IsCurrentSceneMainMenu()
public static bool IsCurrentSceneMainMenu()
```
***
## Checks if the current active scene is the main game scene.
`Returns true if the current active scene is the main game scene, false otherwise.`
```csharp
// RAPI.IsCurrentSceneGame()
public static bool IsCurrentSceneGame()
```
***
## Gets the username associated with a SteamID.
`Returns the player's username.`
{% tabs %}
{% tab title="Method" %}
```csharp
// RAPI.GetUsernameFromSteamID(Steamworks.CSteamID)
public static string GetUsernameFromSteamID(CSteamID steamid)
```
{% endtab %}
{% tab title="Example" %}
```cs
string username = RAPI.GetUsernameFromSteamID(playerSteamID);
Debug.Log("Player username: " + username);
```
{% endtab %}
{% endtabs %}
***
## Toggle the mouse cursor with high priority (mostly used by the mod loader).
{% tabs %}
{% tab title="Method" %}
```csharp
// RAPI.TogglePriorityCursor(System.Boolean)
public static void TogglePriorityCursor(bool status)
```
{% endtab %}
{% tab title="Example" %}
```cs
RAPI.ToggleCursor(true); // This will show the cursor.
RAPI.ToggleCursor(false); // This will hide the cursor.
```
{% endtab %}
{% endtabs %}
***
## Toggle the mouse cursor.
{% tabs %}
{% tab title="Method" %}
```csharp
// RAPI.ToggleCursor(System.Boolean)
public static void ToggleCursor(bool status)
```
{% endtab %}
{% tab title="Example" %}
```cs
RAPI.ToggleCursor(true); // This will show the cursor.
RAPI.ToggleCursor(false); // This will hide the cursor.
```
{% endtab %}
{% endtabs %}
***
## Gets the local player object from the network.
`Returns the local player object.`
{% tabs %}
{% tab title="Method" %}
```csharp
// RAPI.GetLocalPlayer()
public static Network_Player GetLocalPlayer()
```
{% endtab %}
{% tab title="Example" %}
```cs
Network_Player player = RAPI.GetLocalPlayer();
// The player variable will contain the local player script.
```
{% endtab %}
{% endtabs %}
***
## Broadcasts a chat message to all players.
{% tabs %}
{% tab title="Method" %}
```csharp
// RAPI.BroadcastChatMessage(System.String)
public static void BroadcastChatMessage(string message)
```
{% endtab %}
{% tab title="Example" %}
```cs
RAPI.BroadcastChatMessage("I'm a message");
// Will send "I'm a message" to every player.
```
{% endtab %}
{% endtabs %}
***
## Gives a specified amount of items to the local player.
{% tabs %}
{% tab title="Method" %}
```csharp
// RAPI.GiveItem(Item_Base,System.Int32)
public static void GiveItem(Item_Base item, int amount)
```
{% endtab %}
{% tab title="Example" %}
```cs
RAPI.GiveItem(ItemManager.GetItemByName("item_name"), 5);
// Gives 5 items of "item_name" to the local player.
```
{% endtab %}
{% endtabs %}
***
## Allows an item to be placed on a specific block quad type.
{% tabs %}
{% tab title="Method" %}
```csharp
// RAPI.AddItemToBlockQuadType(Item_Base,RBlockQuadType)
public static void AddItemToBlockQuadType(Item_Base item, RBlockQuadType quadtype)
```
{% endtab %}
{% tab title="Example" %}
```cs
RAPI.AddItemToBlockQuadType(YourNewItem, RBlockQuadType.quad_foundation);
// Allow "YourNewItem" to be placed on foundations.
```
{% endtab %}
{% endtabs %}
***
## Disallows an item from being placed on a specific block quad type.
{% tabs %}
{% tab title="Method" %}
```csharp
// RAPI.RemoveItemFromBlockQuadType(System.String,RBlockQuadType)
public static void RemoveItemFromBlockQuadType(string itemUniqueName, RBlockQuadType quadtype)
```
{% endtab %}
{% tab title="Example" %}
```cs
RAPI.RemoveItemFromBlockQuadType("YourItemUniqueName", RBlockQuadType.quad_foundation);
// Disallow the item with the uniquename "YourItemUniqueName" to be placed on foundations.
```
{% endtab %}
{% endtabs %}
***
## Registers a new item.
{% tabs %}
{% tab title="Method" %}
```csharp
// RAPI.RegisterItem(Item_Base,System.Boolean)
public static void RegisterItem(Item_Base item, bool ignoreMaxValues = false)
```
{% endtab %}
{% tab title="Example" %}
```cs
RAPI.RegisterItem(yourItem); // Replace with actual item initialization
```
{% endtab %}
{% endtabs %}
***
## Unregisters an item, removing it from inventories and world.
{% tabs %}
{% tab title="Method" %}
```csharp
// RAPI.UnregisterItem(Item_Base)
public static void UnregisterItem(Item_Base item)
```
{% endtab %}
{% tab title="Example" %}
```cs
RAPI.UnregisterItem(ItemManager.GetItemByName("item_name"));
```
{% endtab %}
{% endtabs %}
***
## Sets the in-hand prefab object for a specific item.
{% tabs %}
{% tab title="Method" %}
```csharp
// RAPI.SetItemObject(Item_Base,UnityEngine.GameObject,RItemHand)
public static void SetItemObject(Item_Base item, GameObject prefab, RItemHand parent = RItemHand.rightHand)
```
{% endtab %}
{% tab title="Example" %}
```cs
Item_Base newItem = new Item_Base(); // Replace with actual item initialization
GameObject itemPrefab = new GameObject(); // Replace with actual prefab initialization
RAPI.RegisterItem(newItem);
RAPI.SetItemObject(newItem, itemPrefab);
```
{% endtab %}
{% endtabs %}
***
## Sends a network message to all players.
{% tabs %}
{% tab title="Method" %}
```csharp
// RAPI.SendNetworkMessage(Message,System.Int32,Steamworks.EP2PSend,Target,Steamworks.CSteamID)
public static void SendNetworkMessage(Message message, int channel = 0, EP2PSend ep2psend = EP2PSend.k_EP2PSendReliable, Target target = Target.Other, CSteamID fallbackSteamID = new CSteamID())
```
{% endtab %}
{% tab title="Example" %}
```cs
public enum CustomMessages
{
MyCustomMessage = 8000
}
// This will send your network message to all players.
RAPI.SendNetworkMessage(new YourMessageClass((Messages)CustomMessages.MyCustomMessage)); // Replace with your own message class.
```
{% endtab %}
{% endtabs %}
***
## Listens for network messages on a specific network channel.
`Returns the received network message.`
{% tabs %}
{% tab title="Method" %}
```csharp
// RAPI.ListenForNetworkMessagesOnChannel(System.Int32)
public static NetworkMessage ListenForNetworkMessagesOnChannel(int channel = 2)
```
{% endtab %}
{% tab title="Example" %}
```cs
public enum CustomMessages
{
MyCustomMessage = 8000
}
NetworkMessage netMessage = RAPI.ListenForNetworkMessagesOnChannel(15);
if (netMessage != null)
{
CSteamID id = netMessage.steamid;
Message message = netMessage.message;
// Here we use 8000 because we can't modify an enum, you can use any values
// as long as its not in the Messages enum already. Bigger than 1000 is perfect.
if(message.Type == (Messages)CustomMessages.MyCustomMessage){
// Do your stuff with the message now that you know
// its yours and its the wanted type.
YourMessageClass msg = message as YourMessageClass;
}
}
```
{% endtab %}
{% endtabs %}
# Mod
The Mod class serves as the base class for all mods, containing essential information about your mod, customizable events, and more. All mods inherit from this class.
## Allows mods to determine if they can be unloaded at the said moment.
{% tabs %}
{% tab title="Method" %}
```csharp
// Mod.CanUnload(System.String@)
public virtual bool CanUnload(ref string message)
```
{% endtab %}
{% tab title="Example" %}
```cs
bool stillLoading = true;
public override bool CanUnload(ref string message)
{
if (stillLoading)
{
message = "The mod is still loading";
return false;
}
return base.CanUnload(ref message);
}
```
{% endtab %}
{% endtabs %}
***
## Unloads the mod.
```csharp
// Mod.UnloadMod()
public virtual void UnloadMod()
```
***
## Gets the bytes of an embedded file in the mod.
`Returns the bytes of the embedded file, or null if the file doesn't exist.`
{% tabs %}
{% tab title="Method" %}
```csharp
// Mod.GetEmbeddedFileBytes(System.String)
public virtual byte[] GetEmbeddedFileBytes(string path)
```
{% endtab %}
{% tab title="Example" %}
```cs
byte[] myBundleBytes = GetEmbeddedFileBytes("mybundle.assets");
AssetBundle bundle = AssetBundle.LoadFromMemory(myBundleBytes);
```
{% endtab %}
{% endtabs %}
***
## Gets the mod information.
`Returns the mod information from the modinfo.json file.`
{% tabs %}
{% tab title="Method" %}
```csharp
// Mod.GetModInfo()
public JsonModInfo GetModInfo()
```
{% endtab %}
{% tab title="Example" %}
```cs
Debug.Log("Mod version: "+GetModInfo().version);
```
{% endtab %}
{% endtabs %}
***
## Logs a message with the mod name as a prefix.
{% tabs %}
{% tab title="Method" %}
```csharp
// Mod.Log(System.Object)
public void Log(object message)
```
{% endtab %}
{% tab title="Example" %}
```cs
Log("This is a message"); // Outputs: "[ModName] This is a message".
```
{% endtab %}
{% endtabs %}
***
## The WorldEvent\_WorldLoaded event triggers on world load complete.
{% tabs %}
{% tab title="Method" %}
```csharp
// Mod.WorldEvent_WorldLoaded()
public virtual void WorldEvent_WorldLoaded()
```
{% endtab %}
{% tab title="Example" %}
```cs
public override void WorldEvent_WorldLoaded()
{
Debug.Log("The world has loaded");
}
```
{% endtab %}
{% endtabs %}
***
## The WorldEvent\_WorldSaved event triggers on world save.
{% tabs %}
{% tab title="Method" %}
```csharp
// Mod.WorldEvent_WorldSaved()
public virtual void WorldEvent_WorldSaved()
```
{% endtab %}
{% tab title="Example" %}
```cs
public override void WorldEvent_WorldSaved()
{
Debug.Log("The world has been saved");
}
```
{% endtab %}
{% endtabs %}
***
## The LocalPlayerEvent\_Hurt event triggers when the local player takes damage.
{% tabs %}
{% tab title="Method" %}
```csharp
// Mod.LocalPlayerEvent_Hurt(System.Single,UnityEngine.Vector3,UnityEngine.Vector3,EntityType)
public virtual void LocalPlayerEvent_Hurt(float damage, Vector3 hitPoint, Vector3 hitNormal, EntityType damageInflictorEntityType)
```
{% endtab %}
{% tab title="Example" %}
```cs
public override void LocalPlayerEvent_Hurt(float damage, Vector3 hitPoint, Vector3 hitNormal, EntityType damageInflictorEntityType)
{
Debug.Log("Player hurt: " + damage + " damage taken");
}
```
{% endtab %}
{% endtabs %}
***
## The LocalPlayerEvent\_Death event triggers when the local player dies.
{% tabs %}
{% tab title="Method" %}
```csharp
// Mod.LocalPlayerEvent_Death(UnityEngine.Vector3)
public virtual void LocalPlayerEvent_Death(Vector3 deathPosition)
```
{% endtab %}
{% tab title="Example" %}
```cs
public override void LocalPlayerEvent_Death(Vector3 deathPosition)
{
Debug.Log("Player died at: " + deathPosition);
}
```
{% endtab %}
{% endtabs %}
***
## The LocalPlayerEvent\_Respawn event triggers when the local player respawns.
{% tabs %}
{% tab title="Method" %}
```csharp
// Mod.LocalPlayerEvent_Respawn()
public virtual void LocalPlayerEvent_Respawn()
```
{% endtab %}
{% tab title="Example" %}
```cs
public override void LocalPlayerEvent_Respawn()
{
Debug.Log("Player respawned");
}
```
{% endtab %}
{% endtabs %}
***
## The LocalPlayerEvent\_ItemCrafted event triggers when the local player crafts an item.
{% tabs %}
{% tab title="Method" %}
```csharp
// Mod.LocalPlayerEvent_ItemCrafted(Item_Base)
public virtual void LocalPlayerEvent_ItemCrafted(Item_Base item)
```
{% endtab %}
{% tab title="Example" %}
```cs
public override void LocalPlayerEvent_ItemCrafted(Item_Base item)
{
Debug.Log("Item crafted: " + item.UniqueName);
}
```
{% endtab %}
{% endtabs %}
***
## The LocalPlayerEvent\_PickupItem event triggers when the local player picks up a dropped item.
{% tabs %}
{% tab title="Method" %}
```csharp
// Mod.LocalPlayerEvent_PickupItem(PickupItem)
public virtual void LocalPlayerEvent_PickupItem(PickupItem item)
```
{% endtab %}
{% tab title="Example" %}
```cs
public override void LocalPlayerEvent_PickupItem(PickupItem item)
{
Debug.Log("Picked up item: " + item.itemInstance?.UniqueName);
}
```
{% endtab %}
{% endtabs %}
***
## The LocalPlayerEvent\_DropItem event triggers when the local player drops an item.
{% tabs %}
{% tab title="Method" %}
```csharp
// Mod.LocalPlayerEvent_DropItem(ItemInstance,UnityEngine.Vector3,UnityEngine.Vector3,System.Boolean)
public virtual void LocalPlayerEvent_DropItem(ItemInstance item, Vector3 position, Vector3 direction, bool parentedToRaft)
```
{% endtab %}
{% tab title="Example" %}
```cs
public override void LocalPlayerEvent_DropItem(ItemInstance item, Vector3 position, Vector3 direction, bool parentedToRaft)
{
Debug.Log("Dropped item: " + item.UniqueName + " at position: " + position);
}
```
{% endtab %}
{% endtabs %}
***
## The WorldEvent\_OnPlayerConnected event triggers when a player connects to the world.
{% tabs %}
{% tab title="Method" %}
```csharp
// Mod.WorldEvent_OnPlayerConnected(Steamworks.CSteamID,RGD_Settings_Character)
public virtual void WorldEvent_OnPlayerConnected(CSteamID steamid, RGD_Settings_Character characterSettings)
```
{% endtab %}
{% tab title="Example" %}
```cs
public override void WorldEvent_OnPlayerConnected(CSteamID steamid, RGD_Settings_Character characterSettings)
{
Debug.Log("Player connected: " + steamid);
}
```
{% endtab %}
{% endtabs %}
***
## The WorldEvent\_OnPlayerDisconnected event triggers when a player disconnects from the world.
{% tabs %}
{% tab title="Method" %}
```csharp
// Mod.WorldEvent_OnPlayerDisconnected(Steamworks.CSteamID,DisconnectReason)
public virtual void WorldEvent_OnPlayerDisconnected(CSteamID steamid, DisconnectReason disconnectReason)
```
{% endtab %}
{% tab title="Example" %}
```cs
public override void WorldEvent_OnPlayerDisconnected(CSteamID steamid, DisconnectReason disconnectReason)
{
Debug.Log("Player disconnected: " + steamid + " Reason: " + disconnectReason);
}
```
{% endtab %}
{% endtabs %}
***
## The WorldEvent\_WorldUnloaded event triggers on world unload.
{% tabs %}
{% tab title="Method" %}
```csharp
// Mod.WorldEvent_WorldUnloaded()
public virtual void WorldEvent_WorldUnloaded()
```
{% endtab %}
{% tab title="Example" %}
```cs
public override void WorldEvent_WorldUnloaded()
{
Debug.Log("World unloaded");
}
```
{% endtab %}
{% endtabs %}
***
## The ModEvent\_OnModLoaded event triggers when a mod is loaded.
{% tabs %}
{% tab title="Method" %}
```csharp
// Mod.ModEvent_OnModLoaded(HMLLibrary.Mod)
public virtual void ModEvent_OnModLoaded(Mod mod)
```
{% endtab %}
{% tab title="Example" %}
```cs
public override void ModEvent_OnModLoaded(Mod mod)
{
Debug.Log("Mod loaded: " + mod.name);
}
```
{% endtab %}
{% endtabs %}
***
## The ModEvent\_OnModUnloaded event triggers when a mod is unloaded.
{% tabs %}
{% tab title="Method" %}
```csharp
// Mod.ModEvent_OnModUnloaded(HMLLibrary.Mod)
public virtual void ModEvent_OnModUnloaded(Mod mod)
```
{% endtab %}
{% tab title="Example" %}
```cs
public override void ModEvent_OnModUnloaded(Mod mod)
{
Debug.Log("Mod unloaded: " + mod.name);
}
```
{% endtab %}
{% endtabs %}
# Accessing the player instance
In order to access the local player instance, we use the `GetLocalPlayer` method from the `RAPI` class it return the instance of the player `Network_Player`
```csharp
Network_Player player = RAPI.GetLocalPlayer();
```
# Adding private variables
Adding private variables to an existing Raft class is sometimes very necessary. There're many ways to add new variables. In this article we will consider the method provided by [Whitebrim](https://www.raftmodding.com/user/Whitebrim). (Discord Whitebrim#4444)
We will store variables in the newly created class and add an extension for original Raft class. You can read how C# extensions work [here](https://docs.microsoft.com/dotnet/csharp/programming-guide/classes-and-structs/extension-methods).
We need to create new **`ConditionalWeakTable`**. It will store our data classes and link them to original classes. This class is specifically created for our case, if you're interested you can read more about it [here](https://docs.microsoft.com/ru-ru/dotnet/api/system.runtime.compilerservices.conditionalweaktable-2?view=netframework-4.5).
In this example we will add new **`private bool isLocked`** variable to **`SteeringWheel`** class:
**First**, we need to **create data class** to store all data we need to add:
```csharp
[Serializable]
public class SteeringWheelAdditionalData
{
public bool isLocked;
public SteeringWheelAdditionalData()
{
isLocked = false;
}
}
```
**You must add `[Serializable]` attribute that our class could be saved.** Also you need to create default constructor with no parameters to initialize class with default values.
**Second**, we need to **create an extension class** to store and handle data:
```csharp
public static class SteeringWheelExtension
{
private static readonly ConditionalWeakTable data =
new ConditionalWeakTable();
public static SteeringWheelAdditionalData GetAdditionalData(this SteeringWheel steeringWheel)
{
return data.GetOrCreateValue(steeringWheel);
}
public static void AddData(this SteeringWheel steeringWheel, SteeringWheelAdditionalData value)
{
try
{
data.Add(steeringWheel, value);
}
catch (Exception) { }
}
}
```
Then you need to **patch original class**. In our case we need to change displaying text depending on **`IsLocked`** state. We will patch **`OnIsRayed()`** method inside **`SteeringWheel`** class:
```csharp
[HarmonyPatch(typeof(SteeringWheel), "OnIsRayed")]
class SteeringWheelPatchOnIsRayed
{
private static void Postfix(SteeringWheel __instance, ref DisplayTextManager ___displayText)
{
if (!__instance.GetAdditionalData().isLocked)
___displayText.ShowText("Press to LOCK rotation", MyInput.Keybinds["RMB"].MainKey, 2, 0, false);
else
___displayText.ShowText("Press to UNLOCK rotation", MyInput.Keybinds["RMB"].MainKey, 2, 0, false);
if (MyInput.GetButtonDown("RMB"))
__instance.GetAdditionalData().isLocked = !__instance.GetAdditionalData().isLocked; // Toggle bool
}
}
```
You can read more about **Harmony patching** [here](https://github.com/pardeike/Harmony/wiki/Patching).
Also you need to **apply patch**:
```csharp
public class BetterSteeringWheel : Mod
{
private HarmonyInstance harmonyInstance;
public void Start()
{
harmonyInstance = new Harmony("com.whitebrim.bettersteeringwheel"); // It's custom patch name, you need to name your patch differently
harmonyInstance.PatchAll(Assembly.GetExecutingAssembly());
}
public void OnModUnload()
{
harmonyInstance.UnpatchAll();
Destroy(gameObject);
}
}
```
You can access new data using class instance. **`SteeringWheel.GetAdditionalData()`**.
Example for **`float`** and **`string`**:
```csharp
[Serializable]
public class YourClassAdditionalData
{
public float floatVar;
public string stringVar;
public CustomClassAdditionalData()
{
floatVar = 0;
stringVar = "None";
}
}
public static class CustomExtension // Nothing changed :)
{
private static readonly ConditionalWeakTable data =
new ConditionalWeakTable();
public static YourClassAdditionalData GetAdditionalData(this YourClass yourClass)
{
return data.GetOrCreateValue(yourClass);
}
public static void AddData(this YourClass yourClass, YourClassAdditionalData value)
{
try
{
data.Add(yourClass, value);
}
catch (Exception) { }
}
}
```
### Saving private variables
To save private variables you need to patch **`RDG_%RaftClassName%`** class and method that is invoked inside switch in **`SaveAndLoad`** class in **`RestoreRGDGame(RGD_Game game)`** method.
In this example we will use **`SteeringWheel`** class and save data from **`Adding private variables`** section.
**First**, we have to add new link **`RGD Class -> our additional data class`** (ConditionalWeakTable):
```csharp
public static class SteeringWheelExtension
{
public static ConditionalWeakTable RGD_data =
new ConditionalWeakTable();
public static void AddData(this RGD_SteeringWheel RGD_SteeringWheel, SteeringWheelAdditionalData value)
{
try
{
RGD_data.Add(RGD_SteeringWheel, value);
}
catch (Exception) { }
}
}
```
**Second**, we need to patch **`RGD_SteeringWheel`** class. There're two constructors (one for saving, another for loading) and **`GetObjectData`** method (to control flow of Serialization).
```csharp
class RGD_SteeringWheelPatch
{
[HarmonyPatch(typeof(RGD_SteeringWheel), MethodType.Constructor, new Type[]{ typeof(RGDType), typeof(SteeringWheel) })]
class RGD_SteeringWheelConstructor1 // Constructor for saving
{
private static void Prefix(RGD_SteeringWheel __instance, ref SteeringWheel steeringWheel)
{
__instance.AddData(steeringWheel.GetAdditionalData());
}
}
[HarmonyPatch(typeof(RGD_SteeringWheel), MethodType.Constructor, new Type[] { typeof(SerializationInfo), typeof(StreamingContext) })]
class RGD_SteeringWheelConstructor2 // Constructor for loading
{
private static void Prefix(RGD_SteeringWheel __instance, ref SerializationInfo info)
{
try
{
__instance.AddData(JsonUtility.FromJson(info.GetString("AdditionalData"))); // Loads from Json that we will create in GetObjectData
}
catch (Exception) { }
}
}
[HarmonyPatch(typeof(RGD_SteeringWheel), "GetObjectData")]
class GetObjectData // Interfering with the serialization flow and adding our custom data to the save
{
private static void Postfix(RGD_SteeringWheel __instance, ref SerializationInfo info)
{
SteeringWheelAdditionalData value;
if (SteeringWheelExtension.RGD_data.TryGetValue(__instance, out value))
info.AddValue("AdditionalData", JsonUtility.ToJson(value)); // We need to use json because worlds loads before mod compiles
}
}
}
```
**Lastly**, we need to find method that loads saved block data and patch it. This method is invoked inside switch in **`SaveAndLoad`** class in **`RestoreRGDGame(RGD_Game game)`** method:
```csharp
switch (rgd.type)
{
case RGDType.Block:
{
// Important code
break;
}
case RGDType.Block_Door:
{
// Important code
break;
}
// etc...
```
Our *case*:
```csharp
case RGDType.Block_SteeringWheel:
{
RGD_SteeringWheel rgd_SteeringWheel = rgd as RGD_SteeringWheel;
Block block19 = this.RestoreBlock(network_Player.BlockCreator, rgd_SteeringWheel);
if (block19 != null)
{
SteeringWheel componentInChildren3 = block19.GetComponentInChildren();
if (componentInChildren3 != null)
{
componentInChildren3.RestoreWheel(rgd_SteeringWheel); // <- This line
}
}
break;
}
```
In our case method is called **`RestoreWheel(RGD_SteeringWheel rgdWheel)`**. This method contains instructions on how to deserialize RGD class to retrieve saved data. We will add our custom instructions:
```csharp
[HarmonyPatch(typeof(SteeringWheel), "RestoreWheel")]
class SteeringWheelRestoreWheelPatch
{
private static void Prefix(SteeringWheel __instance, RGD_SteeringWheel rgdWheel)
{
SteeringWheelAdditionalData value;
if (SteeringWheelExtension.RGD_data.TryGetValue(rgdWheel, out value))
__instance.AddData(value);
}
}
```
**Congratulations**, our custom data for Steering Wheel is saving and loading successfully.
Full code you can find downloading [Better Steering Wheel](https://www.raftmodding.com/mods/better-steering-wheel) mod.
# Spawning dropped items
To drop/spawn an item we use the `DropItem` method from the `Helper` class.
```csharp
Network_Player player = RAPI.GetLocalPlayer();
Item_Base item = ItemManager.GetItemByName("Raw_Potato");
Helper.DropItem(new ItemInstance(item, 1, item.MaxUses), player.transform.position, player.CameraTransform.forward,player.transform.ParentedToRaft());
```
# Get selected hotbar item
To get the current item that the player has selected we use the `GetSelectedHotbarItem` method from the `PlayerInventory` class.
```csharp
ItemInstance currentItem = RAPI.GetLocalPlayer().Inventory.GetSelectedHotbarItem();
RConsole.Log("Current Item : " + currentItem.settings_Inventory.DisplayName);
```
# Get the current SteamID
To retrieve the current user steamid we use the `GetSteamID` method from the `SteamUser` class.\
We also need to use the `Steamworks` namespace by adding `using Steamworks;` at the top of your class.
```csharp
using Steamworks;
CSteamID steamid = SteamUser.GetSteamID();
```
# Get the current username
To retrieve the current user name we use the `GetPersonaName` method from the `SteamFriends` class.\
We also need to use the `Steamworks` namespace by adding `using Steamworks;` at the top of your class.
```csharp
using Steamworks;
string username = SteamFriends.GetPersonaName();
```
# Giving items to a player
To give an item to a player you can use the `AddItem` method on the `PlayerInventory` class.
```csharp
// RAPI.GetLocalPlayer().Inventory.AddItem();
RAPI.GetLocalPlayer().Inventory.AddItem("Raw_Potato",1);
```
# Modifying private variables
Modifying private variables is clearly necessary when modding raft. Let's see how easy it is!
To modify private variables we need to use **Harmony**. You can visit the Harmony wiki by clicking [here](https://github.com/pardeike/Harmony/wiki).\
\&#xNAN;*`Harmony is a library for patching, replacing and decorating .NET and Mono methods during runtime.`*\
\
To use harmony you simply need to add the `HarmonyLib` namespace by adding `using HarmonyLib;` at the top of your class.
\
To modify a **non-static private variable** you use Traverse.Create() with the object instance, .Field() with the field name and .SetValue()
```csharp
Traverse.Create(ScriptInstance).Field("fieldname").SetValue(newvalue);
// For example to set the value "stats" of the class Network_Player we can do that :
Traverse.Create(RAPI.getLocalPlayer()).Field("stats").SetValue(mynewstats);
```
\
To modify a **static private variable** you also use Traverse.Create() but with the class type, .Field() with the field name and also .SetValue();
```csharp
Traverse.Create(typeof(classname)).Field("fieldname").SetValue(newvalue);
// For example to set the value "allAvailableItems" of the class ItemManager we can do that :
Traverse.Create(typeof(ItemManager)).Field("allAvailableItems").SetValue(mynewitemlist);
```
# Mod Slugs (Unique Identifier)
Mod slugs are the mods identifiers that ends in the mod url.
Slugs are strings that can be used in URLs. Slugs must fulfill all of the following rules:
* Slugs must be at least one character and at most 64 characters long.
* Slugs may only contain letters, numbers, dots ("."), dashes ("-") and underscores ("\_").
* All letters must be in lower case and from the basic latin alphabet.
### Examples
{% hint style="success" %}
Good examples:
* *`my-mod`*
* *`version-1.3.4`*
* *`test-6.4.1_RC-3`*
{% endhint %}
{% hint style="danger" %}
Bad examples:
* *`be$t-mod`*(dollar signs are not allowed)
* *`café-mod`*("é" is not a letter of the latin alphabet)
* *``* ("<>()'/" are not allowed)
* *`my mod 2`* (whitespaces are not allowed)
* *`a-very-very-very-very-very-very-very-very-very-very-very-very-very-long-name`* (longer than 64 characters)
{% endhint %}
# Raft Dedicated Server
{% hint style="info" %}
The RDS documentation has been moved to [rdswiki.raftmodding.com](https://rdswiki.raftmodding.com) !
{% endhint %}

 # Installing Raft Mod Loader
This tutorial is designed to guide you through the process of installing RaftModLoader.
## 1. Downloading the Launcher
**Start by downloading our latest launcher version from** [**here**](https://www.raftmodding.com/loader)**.**\
After downloading, you can place it anywhere you prefer.\
We suggest keeping it on your desktop or another easily accessible location for convenience.
# Installing Raft Mod Loader
This tutorial is designed to guide you through the process of installing RaftModLoader.
## 1. Downloading the Launcher
**Start by downloading our latest launcher version from** [**here**](https://www.raftmodding.com/loader)**.**\
After downloading, you can place it anywhere you prefer.\
We suggest keeping it on your desktop or another easily accessible location for convenience.


.png?alt=media)
.png?alt=media)
.png?alt=media)
.png?alt=media)
.png?alt=media)
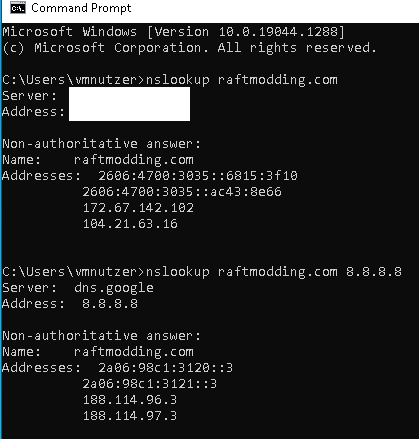
.png?alt=media)
.png?alt=media)
.png?alt=media)
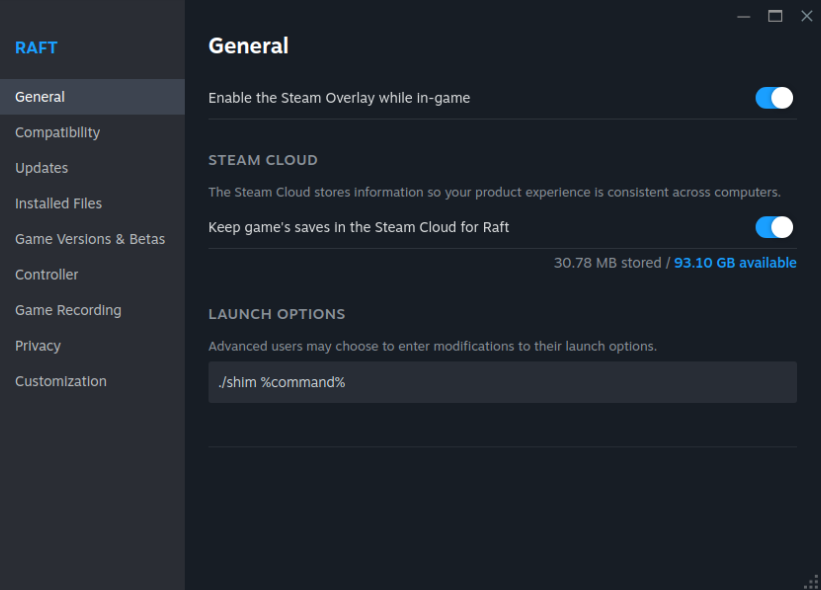
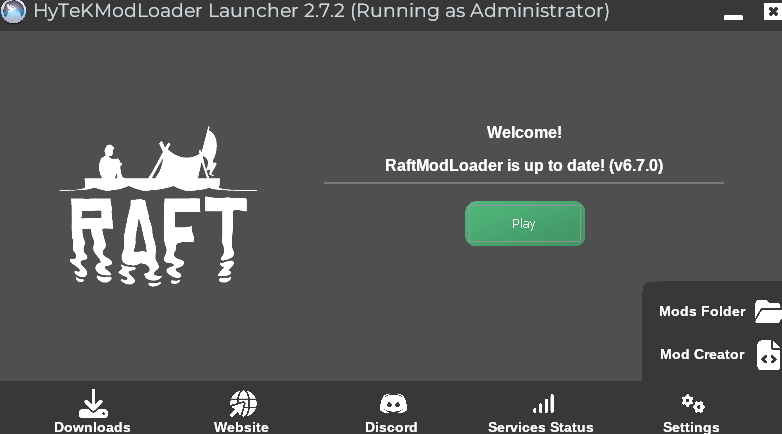
.png?alt=media)
%20(1).png?alt=media)
%20(1).png?alt=media)
%20(1).png?alt=media)
%20(1)%20(1).png?alt=media)
%20(1)%20(1).png?alt=media)
%20(1)%20(1).png?alt=media)
%20(1).png?alt=media)
%20(1).png?alt=media)
%20(1).png?alt=media)
%20(1).png?alt=media)
%20(1).png?alt=media)
.png?alt=media)
.png?alt=media)
.png?alt=media)
.png?alt=media)
.png?alt=media)
.png?alt=media)
.png?alt=media)
.png?alt=media)
.png?alt=media)
.png?alt=media)
.png?alt=media)
.png?alt=media)
.png?alt=media)
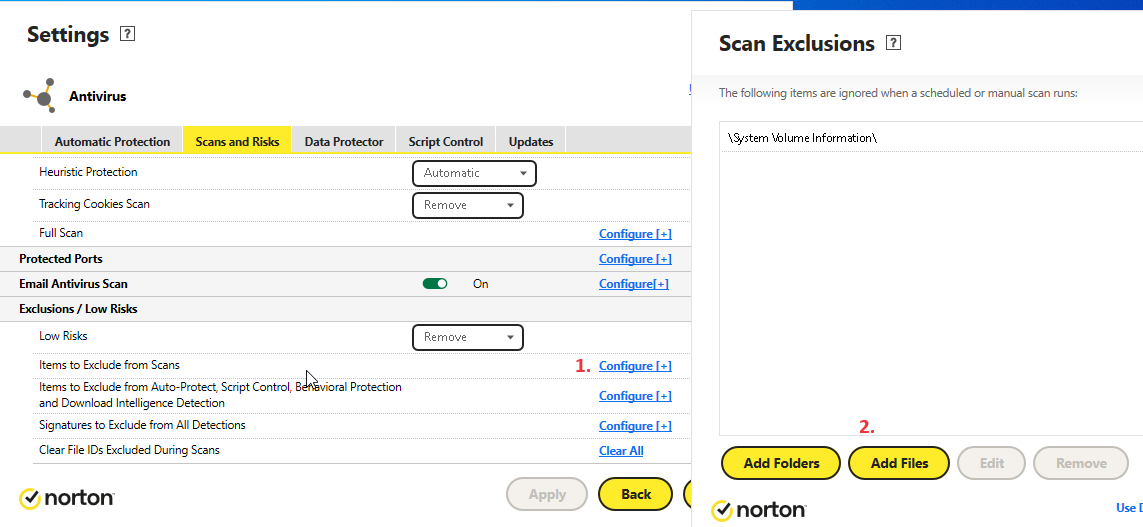
%20(1).png?alt=media)
%20(1).png?alt=media)
%20(1).png?alt=media)
.png?alt=media)
.png?alt=media)


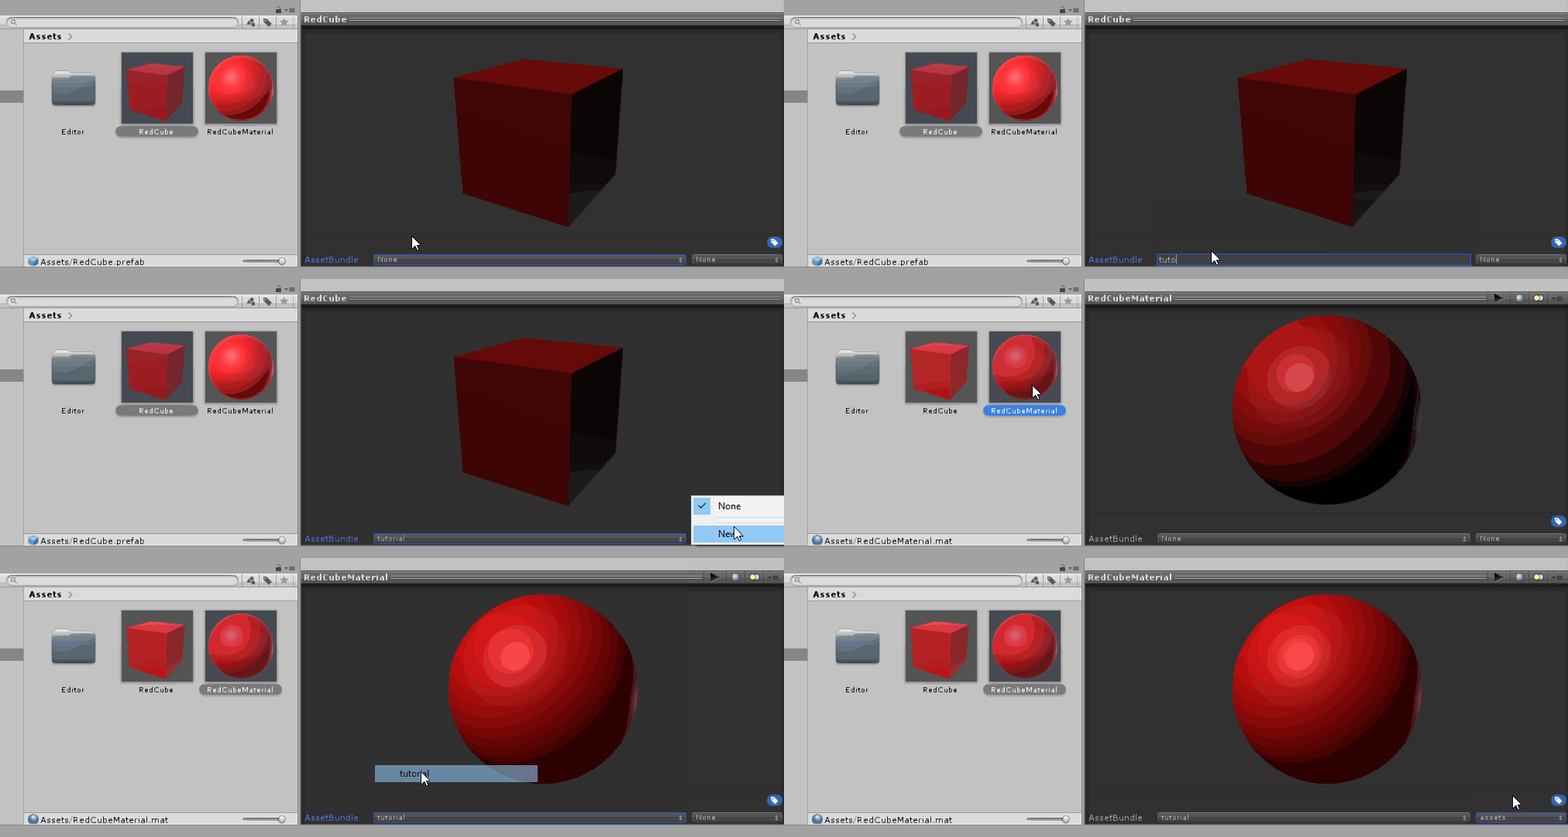
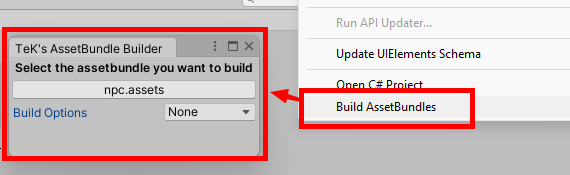

 And here is it! As this can be a bit complicated if you encounter any issue or if you are blocked at a specific step, feel free to join our [Modding Discord](https://www.raftmodding.com/discord) and ask for help in [#support](https://discordapp.com/channels/451507895075471383/636994378618896436).
# How to create console commands
This tutorial is intended to guide you through creating custom console commands using the new console attributes.
Console commands are method attributes, that means that you just have to add `[ConsoleCommand(name: "...", docs:"...")]` or `[ConsoleCommand("...","...")]` above your method.\
The **name** argument is the command name itself.\
The **docs** argument is the command description.
{% hint style="info" %}
**Your method does not need to be public but it needs to be static!**
{% endhint %}
If you want to get the arguments of your command when its ran you can simply add a string\[] parameter named `args` as shown below.
```csharp
[ConsoleCommand(name: "useful", docs: "this command is useful.")]
public static void MyCommand(string[] args)
{
Debug.Log("You entered " + args.Length + " arguments!");
}
```
The method can also have a string return type and will display the returned value as shown below.
```csharp
[ConsoleCommand(name: "useful", docs: "this command is useful.")]
public static string MyCommand(string[] args)
{
return "You entered " + args.Length + " arguments!";
}
```
As said above, commands needs to be static, so in order to access your non static variables you can use the mod instance as shown below.
```csharp
public string myNonStaticVariable = "some stuff";
public MyModType instance;
void Start(){
instance = this;
}
[ConsoleCommand(name: "useful", docs: "this command is useful.")]
public static string MyCommand(string[] args)
{
return "My Variable : " + instance.myNonStaticVariable;
}
```
{% hint style="info" %}
The commands are automatically registered and automatically unregistered when the mod is unloaded.
{% endhint %}
# Harmony basics
This tutorial is intended to guide you through using Harmony to patch the game methods and more.
```csharp
using HarmonyLib;
```
## Adding to Code
To make your code work with existing mechaincs many times you will need to add your own code to a built in object. This can also let your mod act differently depending on if the player has specific other mods installed as well such as modifying recipes to use mod items if available or use vanilla items otherwise.
Harmony lets you do this by creating Patches. There are a few valid ways to set up your patches but a reliable one is to use attributes.
Each Patch will be its own class like so:
```csharp
[HarmonyPatch(typeof(BlockCreator), "CanBuildBlock")]
public class HarmonyPatch_IgnoreCollisionOnAlt
{
[HarmonyPrepare]
static bool IsCoolModInstalled()
{...}
[HarmonyPostfix]
static BuildError CheckForAlt(BuildError __result)
{...}
}
```
With one or more static methods that add or act on the target code.
{% hint style="warning" %}
Remember, your methods need to be static!
{% endhint %}
The class attribute lets Harmony know "what" to use the code on. typeof(BlockCreator) means it is trying to change how one of the methods of the BlockCreator works. That method is CanBuildBlock() and Harmony searches for it by string so make sure it matches the method name!
The method attribute lets Harmony know "when" to use the code in the patch. There are \[HarmonyPrepare], \[HarmonyPrefix], \[HarmonyPostfix], \[HarmonyTranspiler], and \[HarmonyTargetMethod] each executing at a different time or in a different way.
### \[HarmonyPrepare]
This lets you check some things before the patch takes place to see if you even want to change something.
This method expects you to return `false` to indicate Harmony should skip this patch.
```csharp
[HarmonyPrepare]
static bool IsBoxOpeningChanged()
{
//Look at all methods that got patched.
foreach(MethodBase method in Harmony.GetAllPatchedMethods()){
//See if the one you need has been modified
if(method.Name == "OpenBox")
//Skip patch because another mod changed something you use
return false;
}
return true;
}
```
### \[HarmonyPrefix]
This code takes place just before the original method happens and can be used to skip it all together.
This means you can replace a method entirely by having a Prefix do stuff then skip the original method by returning `false`
If the original method needed to return some value the patched method can accept the `ref "Type" __result` arguement by reference. This will make it look like the original method is returning whatever `__result` is set to
```csharp
[HarmonyPrefix]
static bool AlwaysReturnTrue(ref bool __result)
{
//Set return value to true
__result = true;
//Tell Harmony to not run the original method
return false;
}
```
You can also use this method to store values that can be accessed in the Postfix if you have one via `__state`. You can use `ref` or `out` to set the `__state` to whatever value or type you want. If you need to store more data then you need to make your own object to pass on to the Postfix
```csharp
static void Prefix(out Stopwatch __state)
{
__state = new Stopwatch(); // Stopwatch is a custom timer class
__state.Start();
}
static void Postfix(Stopwatch __state)
{
__state.Stop();
FileLog.Log(__state.Elapsed.ToString());
}
```
### \[HarmonyPostfix]
This code takes place right after the original method. It can take in the `__result` from the original method and use it or even change it.
One benefit of Postfixs is that they always run. No matter where the original method escaped its code from it will go to the Postfix right after.
{% hint style="info" %}
One quirk of Postfixs is that they can either change `__result` by ref or can return a value that would work the same way, but if they return a result it has to be the same Type as whatever the first arguement in the method is!
{% endhint %}
```csharp
[HarmonyPostfix]
static BuildError CheckForAlt(BuildError __result, BlockCreator __instance)
{...}
```
### \[HarmonyTranspiler]
Transpilers are a much more advanced way to get your own code to run. It is a bit out of the scope of a tutorial here so I will link to [this article](https://harmony.pardeike.net/articles/patching-transpiler.html#basic-transpiler-tutorial)
To give a simplified overview: Instead of writing code to be executed, you are looking at all of the IL instructions that a chunk of code represents and doing some of your own instructions whenever you think the right time is.
There are also wonderful tools out there that help show you what your IL code will look like from C# code snippets. Try checking out [LINQPad](https://www.linqpad.net/)
### \[HarmonyTargetMethod]
TargetMethod is another powerful tool that lets you reuse your code and apply changes to multiple different methods. It can also be used to conditionally apply changes based on what the code finds.
TargetMethod must return a MethodBase type which points at which method your patch will apply to. Alternatively \[HarmonyTargetMethods] can be used to apply the same patch logic to multiple methods as well though in this case it expects some IEnumerable collection of MethodBases.
Two different ways of doing this would be to iterate through, patching all methods:
```csharp
[HarmonyTargetMethods]
static IEnumerable
And here is it! As this can be a bit complicated if you encounter any issue or if you are blocked at a specific step, feel free to join our [Modding Discord](https://www.raftmodding.com/discord) and ask for help in [#support](https://discordapp.com/channels/451507895075471383/636994378618896436).
# How to create console commands
This tutorial is intended to guide you through creating custom console commands using the new console attributes.
Console commands are method attributes, that means that you just have to add `[ConsoleCommand(name: "...", docs:"...")]` or `[ConsoleCommand("...","...")]` above your method.\
The **name** argument is the command name itself.\
The **docs** argument is the command description.
{% hint style="info" %}
**Your method does not need to be public but it needs to be static!**
{% endhint %}
If you want to get the arguments of your command when its ran you can simply add a string\[] parameter named `args` as shown below.
```csharp
[ConsoleCommand(name: "useful", docs: "this command is useful.")]
public static void MyCommand(string[] args)
{
Debug.Log("You entered " + args.Length + " arguments!");
}
```
The method can also have a string return type and will display the returned value as shown below.
```csharp
[ConsoleCommand(name: "useful", docs: "this command is useful.")]
public static string MyCommand(string[] args)
{
return "You entered " + args.Length + " arguments!";
}
```
As said above, commands needs to be static, so in order to access your non static variables you can use the mod instance as shown below.
```csharp
public string myNonStaticVariable = "some stuff";
public MyModType instance;
void Start(){
instance = this;
}
[ConsoleCommand(name: "useful", docs: "this command is useful.")]
public static string MyCommand(string[] args)
{
return "My Variable : " + instance.myNonStaticVariable;
}
```
{% hint style="info" %}
The commands are automatically registered and automatically unregistered when the mod is unloaded.
{% endhint %}
# Harmony basics
This tutorial is intended to guide you through using Harmony to patch the game methods and more.
```csharp
using HarmonyLib;
```
## Adding to Code
To make your code work with existing mechaincs many times you will need to add your own code to a built in object. This can also let your mod act differently depending on if the player has specific other mods installed as well such as modifying recipes to use mod items if available or use vanilla items otherwise.
Harmony lets you do this by creating Patches. There are a few valid ways to set up your patches but a reliable one is to use attributes.
Each Patch will be its own class like so:
```csharp
[HarmonyPatch(typeof(BlockCreator), "CanBuildBlock")]
public class HarmonyPatch_IgnoreCollisionOnAlt
{
[HarmonyPrepare]
static bool IsCoolModInstalled()
{...}
[HarmonyPostfix]
static BuildError CheckForAlt(BuildError __result)
{...}
}
```
With one or more static methods that add or act on the target code.
{% hint style="warning" %}
Remember, your methods need to be static!
{% endhint %}
The class attribute lets Harmony know "what" to use the code on. typeof(BlockCreator) means it is trying to change how one of the methods of the BlockCreator works. That method is CanBuildBlock() and Harmony searches for it by string so make sure it matches the method name!
The method attribute lets Harmony know "when" to use the code in the patch. There are \[HarmonyPrepare], \[HarmonyPrefix], \[HarmonyPostfix], \[HarmonyTranspiler], and \[HarmonyTargetMethod] each executing at a different time or in a different way.
### \[HarmonyPrepare]
This lets you check some things before the patch takes place to see if you even want to change something.
This method expects you to return `false` to indicate Harmony should skip this patch.
```csharp
[HarmonyPrepare]
static bool IsBoxOpeningChanged()
{
//Look at all methods that got patched.
foreach(MethodBase method in Harmony.GetAllPatchedMethods()){
//See if the one you need has been modified
if(method.Name == "OpenBox")
//Skip patch because another mod changed something you use
return false;
}
return true;
}
```
### \[HarmonyPrefix]
This code takes place just before the original method happens and can be used to skip it all together.
This means you can replace a method entirely by having a Prefix do stuff then skip the original method by returning `false`
If the original method needed to return some value the patched method can accept the `ref "Type" __result` arguement by reference. This will make it look like the original method is returning whatever `__result` is set to
```csharp
[HarmonyPrefix]
static bool AlwaysReturnTrue(ref bool __result)
{
//Set return value to true
__result = true;
//Tell Harmony to not run the original method
return false;
}
```
You can also use this method to store values that can be accessed in the Postfix if you have one via `__state`. You can use `ref` or `out` to set the `__state` to whatever value or type you want. If you need to store more data then you need to make your own object to pass on to the Postfix
```csharp
static void Prefix(out Stopwatch __state)
{
__state = new Stopwatch(); // Stopwatch is a custom timer class
__state.Start();
}
static void Postfix(Stopwatch __state)
{
__state.Stop();
FileLog.Log(__state.Elapsed.ToString());
}
```
### \[HarmonyPostfix]
This code takes place right after the original method. It can take in the `__result` from the original method and use it or even change it.
One benefit of Postfixs is that they always run. No matter where the original method escaped its code from it will go to the Postfix right after.
{% hint style="info" %}
One quirk of Postfixs is that they can either change `__result` by ref or can return a value that would work the same way, but if they return a result it has to be the same Type as whatever the first arguement in the method is!
{% endhint %}
```csharp
[HarmonyPostfix]
static BuildError CheckForAlt(BuildError __result, BlockCreator __instance)
{...}
```
### \[HarmonyTranspiler]
Transpilers are a much more advanced way to get your own code to run. It is a bit out of the scope of a tutorial here so I will link to [this article](https://harmony.pardeike.net/articles/patching-transpiler.html#basic-transpiler-tutorial)
To give a simplified overview: Instead of writing code to be executed, you are looking at all of the IL instructions that a chunk of code represents and doing some of your own instructions whenever you think the right time is.
There are also wonderful tools out there that help show you what your IL code will look like from C# code snippets. Try checking out [LINQPad](https://www.linqpad.net/)
### \[HarmonyTargetMethod]
TargetMethod is another powerful tool that lets you reuse your code and apply changes to multiple different methods. It can also be used to conditionally apply changes based on what the code finds.
TargetMethod must return a MethodBase type which points at which method your patch will apply to. Alternatively \[HarmonyTargetMethods] can be used to apply the same patch logic to multiple methods as well though in this case it expects some IEnumerable collection of MethodBases.
Two different ways of doing this would be to iterate through, patching all methods:
```csharp
[HarmonyTargetMethods]
static IEnumerable